Really, How You Start a Project in Visual Studio Can Mean So Much

You know what I hate? Being well into a project and realizing that you started the wrong type or picked the wrong scaffolding options. Some things can be very difficult to change later. Also, one of my pet peeves is bloated projects. It’s crazy that a new WebAPI project will have styles, javascript files, areas, and a we-only-supported-it-for-one-release help page. In my drive to avoid these issues, I pretty much have project creation down to a science.

You might have your favorite way of creating projects, and I’d love to hear about them. Give me ideas in the comments. But for right now, this is how I normally go about a web site. The DungeonMart website it going to use Web API 2 for data services, AngularJS for UI, and Azure’s DocumentDB for the database (for now, at least).

Start with a web application.

Create a new Web Application

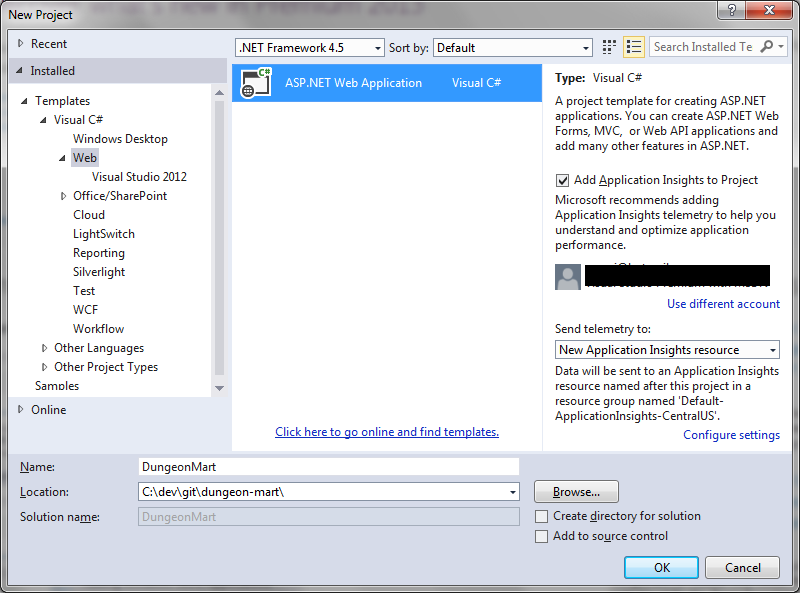
This one looks simple, but there’s so much you can mess up here. Name and Location are important. You can move the whole solution if you don’t like the location, but changing the name is really annoying. I also like to uncheck “Create directory for solution” so I get a flatter folder structure, and I’m already in a source controlled folder so I’m not going to add source control again.

Remember, Templates are bad!

Select Template

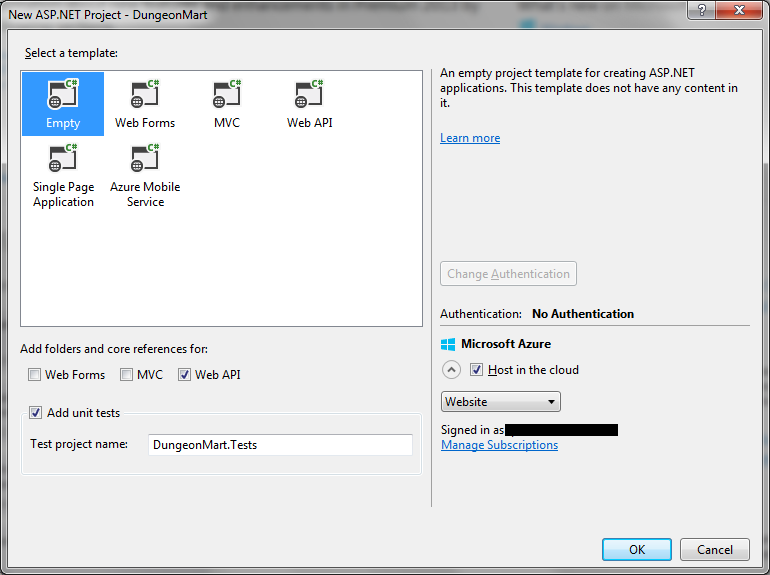
These templates are where all the bloat that I hate so much comes from. So I always pick empty, and then add the core references I want using the checkboxes below the template list. Since the UI will be AngularJS, and not MVC with Razor, I did not choose the MVC checkbox.

I did check the unit tests box, but won’t be doing that again. In VS2012, it would put the unit test project folder in the same sub-folder as the main project folder, but VS2013 is placing the unit test project in the MyDocuments project path. So I had to remove the unit test project and create a new one to get it in the right folder.

If you choose to host in the cloud…

dmart3

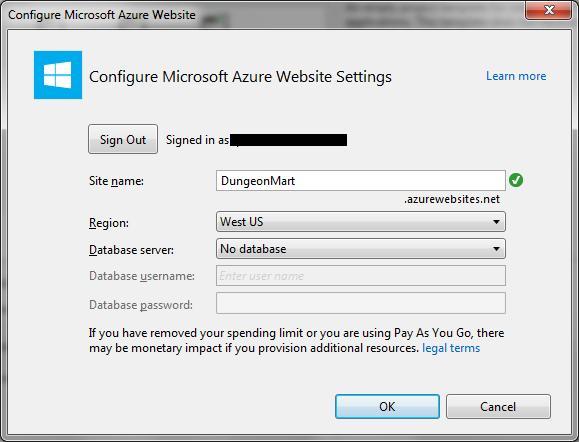
… then make sure you pick the right name here. It’s one of those things that is really, really hard to change later.

What’s next?

Well, now you have an empty project waiting for you to add stuff. If you’ve used templates before, you’ll notice that a lot of things are missing: Areas, Scripts, Content, HomeController, four of the App_Start files, billions of Nuget dependencies, and so on. You have to add the things you’re going to want yourself, as you need them. Probably the first thing would be a start page, and then your first ApiController, but I’ll get into that next time.

Welcome to DungeonMart! Can I Interest You in a Longsword?

I need a web app, something with all kinds of webappy features that can serve as my go to project when I’m writing about different technologies. I’ve actually needed this for a while, but have been struggling to come up with the concept.

I tried for a content management system. Then I thought about a customer management system. I thought about building out that online retailer system that I dreamed up back when I was an Amazon/Ebay seller. The main thing lacking in all these was a mature domain model, due to my lack of experience with the subjects.

Then, in a completely unrelated-to-this-topic search, I stumbled upon a complete database of the D20 System Reference Document (SRD). You would probably know it as something else, but I’m not allowed to use that term. Anyway, it’s a database of character types, monsters, and items and equipment that can be used in various table-top gaming systems, like the kind where you poke around in dungeons and fight mighty dragons. This works out great for me, for a couple of reasons.

  1. The data set is very mature, having evolved from a system that was created in the 70’s.
  2. The SRD is open content. The license is full of all kinds of legalese, but I know from other sites that I can do what I need to do with it.
  3. The data is highly relational, but is represented in the database as unrelated tables. This gives me opportunity to model how one would refactor a site or a data model after the site has gone live, the whole changing-the-engines-while-in-flight problem.

Thus DungeonMart was born, a modern day e-commerce site where an adventurer could go to buy all the known adventuring equipment and items. It could be anything from a pound of wheat to a magical suit of chainmail. It’s nothing special yet, just a page that says Welcome. But as I evolve it over time, it should be pretty cool.

Technology wise, I’m first going to play around with getting the data into DocumentDB, while it’s still in preview on Azure and because I’m possibly going to be doing a session on DocumentDB at an upcoming event. Once the data is in place, I’ll probably progress to a Web API 2 RESTful service and then finally the actual web site part.

I’m sure I’ll get distracted many times on the way as I need to talk about one thing or another, but it will slowly come together. The source will be on my github the whole time, and the site will live on Azure probably for a while, here.

The Three Characteristics of Automated Tests That Actually Matter

Automated Tests are important. People know this. But do they really know what matters when it comes to automated testing?

Well, let’s think about it. What are we trying to accomplish with our automated tests? We’re trying to make sure that the software we just wrote functions and that we didn’t break any existing functionality. But we can do that with manual tests. So what makes automated tests special? The main thing that makes them special is they are automated.

Automated Tests Must Actually Be Automated

I know this seems obvious, but you’d be surprised how easy it is to get this one wrong. For example, one place I worked had a suite of automated tests that had to be manually deployed (by a person), started (by a person), and then monitored (again, by a person). Not very automated, after all.

Automated Tests Must Actually Test the Program

Code coverage and relevance are probably some of the hardest testing concepts to get right. Wanna know why? Because there’s not a definite right answer. The normal target number for code coverage is 80%, but if you’re writing tests just to cover lines and not actually exercise functionality then that number is meaningless. Relevance is more critical than coverage, but there’s no objective way to really measure it. Just making sure you have tests for all the requirements or acceptance criteria is probably a good place to start. After that, just target important sections and give them some extra love.

Automated Tests Must Be Deterministic

If one of your solutions to test failures is, ” run it again,” then you have a problem here. If I give the same test the same inputs, then i should get the same results every time. Automated tests should only fail because the code is bad, not because the tests are bad.

What About Unit vs. Non-unit Tests

Unit tests are good because it’s easy to make them fit all the criteria. But if you can have integrated tests or functional tests that fit the criteria, then use them. In fact, it would probably be a good strategy to mix them all in together. The more tests, the better. Don’t worry about whether or not you’ve truly isolated your test to a unit, worry instead that your code will work, and if it doesn’t then a test will tell you.

So, get out there and write some tests. Hopefully, they’re automated. But if not, write them anyway. Just write some.

The 10 Year Plan Is So Waterfall, Let’s Borrow From Agile

Are you struggling to make a long term plan? Me too. Or at least I was. I finally came to the conclusion that the 10 year plan isn’t natural, and that makes it hard to use. The gaps between goal periods are too long. You can spend a lot of time trying to figure out what can be accomplished in the 5-10 year gap. The plan is also too static, so it gets stale and has to be redone almost from scratch every year.

In my plan, I had such a hard time determining if something should be year 1 or year 5 that I had broken from the pattern and put in a year 2 category. This meant I had 1, 2, 5, and 10. While looking at my columns in Trello, I realized that I could add a 3, move the 10 to 8, and I would have a short Fibonacci sequence.

A Fib-o-what sequence?

In agile software development, we (meaning very smart people before me) discovered that it’s easier to measure the relative complexity of development tasks by using numbers from the Fibonacci sequence. If you’re new to this, the sequence starts with the numbers 1 and 2. After that, the next number is the sum of the previous two numbers. So, it goes 1, 2, 3, 5, 8, 13, and so on.

I thought if the sequence is so good for planning software, maybe I could adapt it to my long term plan. So, I did that and tried to rearrange my goals in that new structure. Not only did it work, it worked really well. And hence, this post.

Start with This Year

So, the first step is to start with what you want to accomplish This Year, or Year 1. Be realistic and know that it’s OK to start the planning after the year has started. Feel free to retroactively add a goal and mark it done. This is the easy column.

Then, look at Next Year

The next number in the sequence is 2. So make a new column and put your goals in it for next year. Be mindful of how much accomplishment you planned on accomplishing this year and be realistic about next year. It’s also good if you have one or two things that start soon, but are realistically year 2 goals. If it helps with the year 2 item to add some intermediate goal to year 1, then do it.

For example, if you wanted to learn electric guitar, it is a realistic goal that you could be at a level where you could play Hot for Teacher within 2 years, but probably not within the first year. In that case, add Hot for Teacher as a year 2 goal and Back in Black as a year 1 goal. If you can’t play Back in Black at the end of year 1, you probably won’t be ready for Hot for Teacher at the end of year 2.

Now for Year 3

Now it’s getting harder, but stick with me. Take the amount of accomplishment that you’ve now established can be done in one year, and add that to year 2 to create your year 3 goals. That’s the key part of the planning process. Add amounts of accomplishment you’ve already established to the last year to make the next year. It’s easy to know if you’re being realistic, because you have history. It’s future history, but you know what I mean. If you thought it would take two years to write a book, don’t put another book in year 3. However, it might be realistic to plan to be halfway done with the next book at year 3.

Rinse and Repeat

Ok, so you know how much can be accomplished in 2 years. And you know your year 3 goals. Add that level of accomplishment to year 3 and you have year 5. Add your year 3 accomplishment level to year 5 and you have year 8. If you really want, you can do that again for year 13. I really wouldn’t recommend going farther than that, but it’s your plan so do whatever works.

Twelve Months Later

Now for the second really good part of the Fibonacci plan. After the first year is over, go back to your plan and make some tweaks for a whole new plan. Rename year 1 to Last Year. Rename year 2 to year 1, year 3 to year 2, and add a new column for year 3. Take what wasn’t finished Last Year and move it to the new year 1. Now that you have an even more realistic view of what can be accomplished in a year, repeat the planning process to shuffle your goals and create new ones. If your book is still a realistic goal for the new year 1, a good goal for the new year 3 would be that second book.

Getting an Existing Database and Collection in DocumentDB

The API methods for creating databases and collections is easy to find, but how do you get a database and collection that’s already created? It’s definitely the more common use case, but it’s so obviously not there. Never fear, for we can wrap the queries used to get databases and collections in extension methods and pretend that it was always part of the API.

Did you say queries?

Yes, I did. You have to query the system database collection to get a link (not a URI, more like an ID) for your database, and ditto for your collection. The good news is that you don’t actually have to know where those collections live, because there are built in methods for querying them. It was almost easy.

First, get the Database

It’s kind of a two step process. Before you can get a collection, you have to get the database that contains that collection. But we’re going to make it easy with two simple extension methods. The first one will be used to get a Database object. You’ll rarely use this method directly, because the most common reason to get a Database object is to query it for the collection you need.

public static async Task<Database> GetOrCreateDatabaseAsync(
    this DocumentClient client, string databaseId)
{
    var databases = client.CreateDatabaseQuery()
        .Where(db => db.Id == databaseId).ToArray();

    if (databases.Any())
    {
        return databases.First();
    }

    return await client.CreateDatabaseAsync(
        new Database {Id = databaseId});
}

The method first tries to get the Database from the query. If it’s not found, then it creates the Database and returns it. I put the extension on DocumentClient because that is where CreateDatabaseAsync lives, so it made sense that the Get method would be, or appear to be, in the same place.

Then, get the collection

Now that we have a Database object, we can use its SelfLink to get the DocumentCollection. This extension method will be used a lot. It looks like this:

public static async Task<DocumentCollection>
    GetOrCreateDocumentCollectionAsync(
        this DocumentClient client,
        string databaseId,
        string collectionId)
{
    var database = await GetOrCreateDatabaseAsync(
        client, databaseId);

    var collections = client
        .CreateDocumentCollectionQuery(database.SelfLink)
        .Where(col => col.Id == collectionId).ToArray();

    if (collections.Any())
    {
        return collections.First();
    }

    return await client.CreateDocumentCollectionAsync(
        database.SelfLink,
        new DocumentCollection {Id = collectionId});
}

This works a lot like the other method, where it tries to get the collection and if it doesn’t exist then it creates the DocumentCollection and returns it. It also uses the other method to get the Database for its SelfLink. Note that this method asks for the database Id, not the object. I did that to make the two step process only look like one step from the outside.

Okay, now what?

This part’s easy. When you need a DocumentCollection object, just use the extension method. You’ll probably want to only do that once and store it in a static. We’re not going to put state in the DocumentCollection object, we really just want the DocumentLink. Here’s how you get it:

private const string DatabaseId = "ContentDB";
private const string CollectionId = "ContentCollection";
private static readonly DocumentCollection Collection =
    Client.GetDocumentCollection(DatabaseId, CollectionId).Result;

And then you use it for a document query like so:

public List<Content> GetList()
{
    var documentsLink = Collection.DocumentsLink;
    var contentList = _client
        .CreateDocumentQuery<Content>(documentsLink)
        .AsEnumerable().ToList();
    return contentList;
}

And that’s it, a very natural way to get the DocumentLink. Then again, maybe it makes sense to just store the DocumentLink as a static and just use that…

Consider that homework.

Paging with Range Headers using AngularJS and Web API 2 (Part 2)

In part one of this series, I talked about my need to add paging to a web page, how the HTTP range headers work, and how to use them on the client side in AngularJS. If you jumped in here, you can review that here. In this post, I’ll go over how to use the range headers in an ASP.NET Web API controller.

Getting the values

Getting the values for the range header in the Api controller is fairly simple. Inherited from ApiController is a property called Request, which represents the HttpRequestMessage. In the Request is a Headers collection, and in that collection is the Range. If the range header wasn’t there, I typically assume the user wants all the records so I default the from and to values to 0 and the maximum long value. It looks like this:

long fromCustomer = 0;
long toCustomer = long.MaxValue;
var range = Request.Headers.Range;
if (range != null)
{
    fromCustomer = range.Ranges.First().From.Value;
    toCustomer = range.Ranges.First().To.Value;
}

Returning the Content-Range

This is a little more complicated than getting the values, but still not that bad. The problem is that we don’t have a nice, convenient Response property on our controller. We have to create the response and return that from the method. We need to replace the return of the Get method from IEnumerable<Customer> to a Reponse object that implements IHttpActionResult. This gives us complete control over the Response.

Creating an implementation of IHttpActionResult is not that hard. You only have to implement ExecuteAsync, where you’ll create the response from the request. You’ll also need a constructor for passing in the needed values. Mine looks like this:

public class CustomerGetListResult : IHttpActionResult
{
    private readonly HttpRequestMessage _request;
    private readonly List<Customer> _customers;
    private readonly long _from;
    private readonly long _to;
    private readonly long? _length;

    public CustomerGetListResult(HttpRequestMessage request,
                                 List<Customer> customers,
                                 long from, long to, long? length)
    {
        // Save values for the execute later
        _request = request;
        _customers = customers;
        _from = from;
        _to = to;
        _length = length;
    }

    public Task<HttpResponseMessage> ExecuteAsync(
        CancellationToken cancellationToken)
    {
        HttpStatusCode code;
        if (_length.HasValue)
        {
            // status is 206 if there's more data
            // or 200 if it's at the end
            code = _length - 1 == _to
                ? HttpStatusCode.OK
                : HttpStatusCode.PartialContent;
        }
        else
        {
            // status is 200 if we don't know length
            code = HttpStatusCode.OK;
        }
        // create the response from the original request
        var response = _request.CreateResponse(code, _customers);
        // add the Content-Range header to the response
        response.Content.Headers.ContentRange = _length.HasValue
            ? new ContentRangeHeaderValue(_from, _to, _length.Value)
            : new ContentRangeHeaderValue(_from, _to);
        response.Content.Headers.ContentRange.Unit = "customers";

        return Task.FromResult(response);
    }
}

In ExecuteAsync, we have to take care of three things. First, determine the status code we want to return. Second, create the response with the status code and content. Finally, we add the Content-Range header. Notice the overloaded ContentRangeHeaderValue constructor. If you use the two parameter version, the header value will look like “customers 0-19/*” to indicate that the length is unknown.

Now all that we need to do is construct the result and return it from the controller, which I do in one step:

return new CustomerGetListResult(Request,
    customerList,
    fromCustomer,
    fromCustomer + customerList.Count() - 1,
    CustomerTable.Count());

Final Thoughts

So that’s pretty much it. Remember to check out Part 1 if you haven’t already seen it. Feel free to leave comments, or constructive criticism, or questions below.

Also, the sample code is in my github at https://github.com/qanwi1970/customer-paging.

Paging with Range Headers using AngularJS and Web API 2 (Part 1)

Recently, I needed to take a page with a list and add paging and sorting to it. We didn’t do it when we first wrote the page because the data set was small and we had higher priorities. However, the time was getting near when people would have to deal with a table of over 100 rows. It sounded simple, until the little trick of letting the client know when not to page. Somehow, I needed to tell the client how many total records there were so it could appropriately disable the Next arrow. I read about and debated lots of methods, but finally settled on using HTTP Range headers. I could write about that, but I can save time by saying that I pretty much ended up agreeing with this guy.

Before I get into how to use Range headers, let me briefly cover the what. The HTTP spec allows for partial downloading of content by having the client ask for the part it needs. One of the standard response headers is Accept-Ranges, and it tells the client whether asking for a range is allowed, and what unit to ask for. In the past, the range unit was typically bytes, which the client could use to download files in pieces. Once it knew that, it would ask for a range of bytes using the Range header. The bytes would be in the response content, and the Content-Range response header would tell the client the unit (again), the start and end of the range, and possibly the length of the file.

Fast forward to our RESTful way of doing things and the range unit becomes something like “customers” and the length is more like the total number of customers available. The client might ask for “customers=0-19” with the expectation of getting the first 20 customers. The server would respond with something like “customers 0-19/137”, meaning that it gave the first 20, and there are 137 total customers.

On the AngularJS side, we use the transformRequest field of the resource to add a transform function that will add the Range header. I tried to use the header field, but that just sets the default header for each getCustomers request and we need the header to change for each call. It looks like this:

var customerServices = angular.module('customerServices',
                                      ['ngResource']);

customerServices.factory('customerService', [
    '$resource',
    function($resource) {
        return $resource('/api/CustomerService', {}, {
            getCustomers: {
                method: 'GET',
                isArray: true,
                transformRequest: function(data, headersGetter) {
                    var headers = headersGetter();
                    headers['Range'] = 'customers='
                        + fromCustomer + '-' + toCustomer;
                }
            }
       });
    }
]);

I’ll skip over the Web API part of it, for now (wait for Part 2), and go over handling the response. In the success block of getCustomers, we get the Content-Range header and parse out the important pieces.

 
customerService.getCustomers({},
     function(value, headers) {
         var rangeFields = headers('Content-Range').split(/\s|-|\//);
         $scope.fromCustomer = parseInt(rangeFields[1]);
         $scope.toCustomer = parseInt(rangeFields[2]);
         $scope.totalCustomers = parseInt(rangeFields[3]);
         // and then do cool stuff...

Now that the client knows the from customer, the to customer, and the total number of customers, it can do all the neat paging stuff it wants. It can enable and disable the Previous or Next control. It could place page number links that let the user skip to whatever page they want. It could have some kind of button that goes all the way to the end or all the way to the beginning, and so on.

Don’t miss Part 2, where I’ll go over the Web API side of this puzzle.

Sample code for this series can be found at: https://github.com/qanwi1970/customer-paging


Special thanks to Mathieu Brun for the data ganerator used in the sample (https://github.com/mathieubrun/Cogimator.SampleDataGenerator)

Why I Changed Jobs

The word is out. I’m changing employers. For the sake of all parties involved, let me take a minute to explain the move. I realize some people are making assumptions, and I want everyone to be clear.

First, no ill will towards the old employer

I love what they’re doing. The whole idea behind CommonWell is genius and I hope it becomes a larger reality. They took a WinForms developer and gave him the chance to become an experienced, certified web developer. I got to fly out to San Francisco enough that I was able to learn the sitar. I got to work on the latest technologies. I had a great set of coworkers that were very capable, with an unusually low amount of egos.

There were frustrations, and occasional drama. But what workplace doesn’t have that? And, even in retrospect, those issues were less frequent than most jobs I’ve had and definitely less than a lot of people I talk to at other companies.

So, to be clear, I am not leaving because I’m overly frustrated with something or someone.

It came down to career direction

About eight months ago, a few months before this WordPress account was created, I sat down and tried to figure out what I want to do with the rest of my career. I realized I had two choices. I could stay where I was and use my developer talents to create software in the medical vertical, or I could harness some of my other talents and be something more.

So what are those other talents? In spite of being really smart, I have pretty good social skills (that was a paraphrase of real compliments). I can take relatively complex concepts and break them down so that people can understand them. And, based on the grades of my papers in college, I’m at least a decent writer. All this adds up to the fact that, in addition to coding, I could be facing customers. I could be blogging (is blogging about blogging redundant?). I could speak at conferences or teach.

All those things sound fun, and I wanted to morph my career path to use all those. And that’s where the slight disconnect happened. My employer did not have such a position, and it could be argued that they shouldn’t have that kind of position. They’re selling a set of web services, or a platform, for their customers to use. The realization of that platform did not require the other activities I wished to pursue. In fact, time spent on those other activities would take away from time spent making the platform awesome.

Enter the new employer

The new company has a different model. They’re a consulting firm that sells consulting services. Those services are only as good as the consultant performing them. Therefore, it is in their best interest to have well known hot shots who are part of the development scene. That means they want, or even need, people that are blogging, speaking, and teaching, in addition to developing solutions.

And that is how we came together. My career path exactly matches their employee needs, and together we benefit from some kind of symbiosis. They give me time and budget for blogging, speaking, and going to conferences. With that, I gain stronger skills and notoriety. In return, they are able to sell more consulting because they have a demonstrably better staff than the competition. Imagine how easy it is for the salesperson after they show blogs proving that the company has thought leadership in the area the customer needs.

Final Thoughts

All jobs have hiccups. Your coworkers aren’t perfect. Some of the processes are inefficient. You shouldn’t let those things get to you, or you end up jumping from job to job, letting your emotions dictate your career path by accident. Instead, figure out how to handle those things. Listen to your coworkers before judging, and give them the benefit of the doubt sometimes because technical people are known for having bad communication skills. Remember the qualified compliment I mentioned earlier? I only have pretty good social skills, in light of how smart I am. We all need to be tolerated sometimes.

Data Migration When You’re Always Up

I had a problem. I needed to drastically change a table schema, but our system is always up. We can’t just stop servers, run migration scripts, test everything, and bring it all back up. I needed to change it while it was being used. Someone likened this to changing the engines on a plane while it’s flying. What I decided to do is take the idea of parallel change and apply it to our database. So the schema migration was broken down into three phases: expand, migrate, and contract. With data, though, the migrate phase is particularly tricky. You have to deal with a period where the old version of the data and the new version have to coexist.

So what I did is make it so that the old version of the data (V1) was the source of truth while data migrated over to the new version (V2) with use. Updated clients would ask V2 for the data. If V2 already had the data, then it would return it. If not, then it would go to V1 for the data, convert it to V2 data, and return that. As that process continued, more and more data would get converted to the new format. Any writes have to update both versions.

The Internal Read

All the operations use the same read logic, which looks like this:

CoexistentDataMigration_InternalRead

The steps that are important for coexistence are green. When coexistence is over, those steps will go away.

The Read

Reading from the service takes advantage of the internal read logic, and looks like this:

CoexistentDataMigration_Read

When coexistence is over, the read logic won’t even change.

Inserting Data

Even write operations use the internal read. The insert uses it to see if the entity already exists before adding it.

CoexistentDataMigration_Create

During coexistence, the insert operation needs to insert to V1 as well, to keep the clients using the older methods happy.

Updating Data

Just like the insert, update uses the internal read to see if the entity exists before updating it.

CoexistentDataMigration_Update


Deleting Data

I hope by now you’re getting the idea. One more picture, and then some closing thoughts.

CoexistentDataMigration_Delete

Final Thoughts

One of the parts of all this that seemed a little counter-intuitive was how to get a list of entities. All the operations so far have been against the V2 collection. However, to get a list, we need to go against the V1 collection. Until all the data is migrated, getting a list from the V2 collection will return only a list of what has been migrated, which could leave entities out.

After a while, there will be a point where most of the data that will migrate by usage will have migrated. There’s still data in V1, and it still matters even though nobody has used it in a while. When that time came, I finally needed a script to move the remaining data. The script just got a list of entities that were in V1 but not V2. Then it did a get on all of them to force the conversion.


HiPerfMetrics – My First Open Source Project

This is probably true for any kind of software, but web sites and services need to be fast. People don’t like watching “spinners” on their browser while they wait for a page to load or a button to do something. When spinners happen, people get upset. In some cases, the delay might constitute an incident, a violation of your service level agreement (SLA). That’s the world I live in. If something takes longer than 4 seconds, I hear about it. And if it happens more than a couple of times, I have to figure out what is going on.

That’s where metrics come to save the day. Every service has performance instrumentation on the entry points, not just for the whole method but for all the steps in the method. All those metrics get logged, so if I need to see how a method was performing, I can pull them and get instant answers to how long things were taking. The output could be something like:

 HiPerfMetric 'HomeController.Index' running time - .510406 seconds
-----------------------------------------
 ms        % Task name
-----------------------------------------
  7.934  2 % Validate Inputs 
499.203 97 % Get Content 
  3.269  1 % Assemble model

This tells me that the call to the Index method of the HomeController (the default page) is taking half a second in the controller, and that 97% of that time is spent getting content. Yes, we use CMS, but it shouldn’t take half a second to call that service. At this point, I would look for the content service’s metrics and try to further troubleshoot the half second call. I’m not going to bore you with those details now because, hopefully, you are skilled in the ways of troubleshooting. The important part of this article is the code we use to get the metrics.

We have been using a piece of code from a Code Project article, HiPerfTimer, but we needed it to do more. The report above is our own invention. We’d also like other reports, like a series of log messages, or streaming to an xml file, and more. To do that, we needed another project. So I created HiPerfMetrics. It has the same license as HiPerfTimer and contains the same original source file. But we added code for collecting related timers and reporting on them, as seen above.

The new class, HiPerfMetric, stores a list of timers and a total time for all the timers. And the default report gives an output like the one above. Usage is fairly simple: create a metric, start and stop timers on it, then report. This is an example from one of the tests:

    var metric = new HiPerfMetric("NormalTwoTaskReport");
    metric.Start("task 1");
    Thread.Sleep(250);
    metric.Stop();
    metric.Start("task 2");
    Thread.Sleep(500);
    metric.Stop();
    var report = new DefaultReport
    {
        Metric = metric
    };
    Debug.WriteLine(report.Report());

That’s pretty much it. I’ve put it up on Nuget as HiPerfMetrics, so feel free to get the nuget and use it. If you feel like making HiPerfMetrics better, shoot me a message and we’ll see. I have a wish list and I’m willing to listen to other people’s ideas, too.

Check the github project for my wishlist.